Step-by-Step Guide to Installing I-Tip Hair Extensions
If you’re seeking to add length and volume to your hair, I-Tip hair extensions present an excellent choice. These extensions, which are semi-permanent, are applied individually using small beads or micro-rings, yielding a natural and unnoticeable appearance. While enlisting the expertise of a professional stylist is recommended for the installation of I-Tip extensions, having a grasp of the procedure yourself can also be advantageous. In this comprehensive guide, we’ll provide a step-by-step walkthrough of the I-Tip hair extension installation process, ensuring you achieve stunning and enduring results. For more detailed information on the types of I-Tip hair extensions available and how to choose the right ones for you, click for info.
Understanding I-Tip Hair Extensions
Before diving into the installation process, it’s essential to understand the basics of I-Tip hair extensions. These extensions consist of small bundles of hair with a small, transparent keratin tip at one end. The extensions are attached to the natural hair using small beads or micro-rings, which are clamped securely in place to create a strong bond that lasts for several weeks.
Preparing the Hair
The first step in installing I-Tip hair extensions is to prepare the natural hair. Start by washing and drying the hair thoroughly to ensure it’s clean and free of any product buildup. Use a clarifying shampoo to remove any residue that could interfere with the bonding process. Once the hair is clean and dry, section it into small, even sections using clips or hair ties to keep them separated.
Selecting the Extensions
Next, select the appropriate extensions for each section of hair. Choose extensions that closely match the color, texture, and length of the natural hair for a seamless blend. It’s essential to ensure that the extensions are the correct length and thickness for the desired style and volume.
Attaching the Extensions
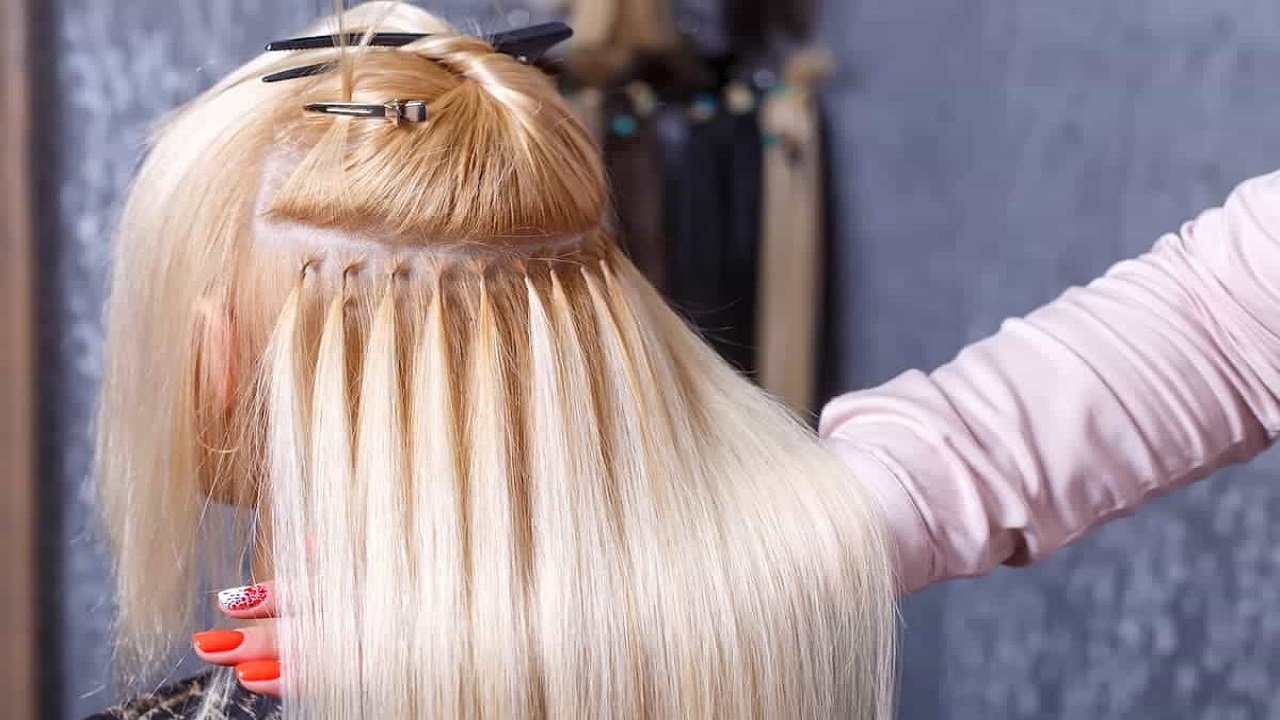
To attach the I-Tip extensions, take a small section of natural hair and thread it through a micro-ring or bead. Slide the bead close to the roots of the hair, leaving a small gap between the bead and the scalp to allow for movement. Take the I-Tip extension and insert the keratin-tipped end into the micro-ring or bead, then use a special clamping tool to secure the bead in place. Repeat this process for each section of hair, working methodically from the bottom up to ensure even coverage.
Blending and Styling
Once all of the extensions are in place, it’s time to blend them with the natural hair for a seamless look. Use a comb or your fingers to gently blend the extensions with the natural hair, making sure there are no visible lines or bumps. Style the hair as desired using heat styling tools or products, being careful to avoid applying direct heat to the bonds.
Final Touches
After installing the extensions, take a final look to ensure everything is blended and secured properly. Trim any excess length if necessary and make any final adjustments to ensure a flawless finish. Encourage the client to run their fingers through their hair to ensure they’re comfortable and happy with the results.
Conclusion
Installing I-Tip hair extensions requires precision, patience, and attention to detail to achieve beautiful, long-lasting results. By following this step-by-step guide and working methodically, you can ensure that the extensions are attached securely and blended seamlessly with the natural hair. Whether you’re a professional stylist or DIY enthusiast, mastering the art of installing I-Tip extensions can open up a world of possibilities for transforming your look and enhancing your confidence. Remember to always prioritize the health and integrity of the natural hair throughout the installation process, and enjoy the stunning results of your newfound length and volume.